Disclaimer: This post contains affiliate links. As an Amazon Associate, I earn from qualifying purchases at no extra cost to you. [Learn More]
Painting your miniature is only half the fun. Designing and finishing the base is what truly anchors your model into a specific world, turning a great paint job into an immersive storytelling piece.
As artists, we want people to do more than just view our work—we want them to experience it. A gorgeous paint job loses its impact if the model is left standing on a plain, unpainted plastic disk.
By approaching the miniature and its base as cooperative concepts, you can use color theory, texture, and thematic elements to dramatically amplify your paint scheme and build a cohesive narrative for your entire collection.
🛠️ Quick Workbench Note: Before we dive in, if you want to skip the guesswork of hunting down individual supplies, I’ve gathered my favorite go-to texture pastes, tools, and terrain elements into a single [Miniature Basing & Storytelling Essentials List on my Amazon Storefront]. Open it up in a new tab to use as a companion guide while you read through the steps below!
A themed, fully finished base grounds your model in reality. It instantly tells the viewer where the character is standing, what climate they are enduring, and what kind of environment they inhabit.
Furthermore, a well-planned base gives you massive artistic control over your miniature’s color palette. You can use the ground color to create striking contrast that makes your main paint scheme pop, or use complementary tones to tie an entire squad together seamlessly.
🎲 Hobby Folklore: The Dice Reroll Myth
Rumor has it within the wargaming community that fully painted and based armies enjoy a significantly higher win ratio on the tabletop. It is often said that dice simply roll better when your models look spectacular. While it might just be local folklore, anecdotally, playing with a fully finished army completely transforms the experience—and the confidence boost certainly doesn’t hurt your tactical decisions!
🌲 Choosing a Theme to Fit Your Miniature
The first step in the process is deciding exactly what story you want to tell. Depending on your personal goals, you can pull inspiration from a few different sources:
Recreating a Setting from Lore or History
If you love established universes, your terrain choices might be guided by existing canon. For example, if you love the legendary jungle warfare regiments from science-fiction settings, a dense, tropical environment is a natural fit.
Hobby Tip: Don’t just settle for a flat layer of green paint. To build a realistic jungle floor, place down fine-textured hobby moss to simulate dense undergrowth, then use a tiny drop of super glue to secure small, dried tea leaves or finely crushed autumn leaves to mimic a decaying rainforest canopy layer.
Creating a Setting from Your Own Creative Writing
If you enjoy writing your own lore, player factions, or fan fiction, the terrain must only fit the boundaries of your imagination. Often, experimenting with unique materials on a base can actually inspire new plot lines, home worlds, or battlefield backgrounds for your characters.
Painting for the “Rule of Cool”
Sometimes, you don’t need a deep backstory—you just go with your gut! If an idea sounds visually striking and makes you excited to pick up your tools, that is more than enough reason to build it.
💡 Brainstorming Creative Concepts & Color Theory
Before reaching for your hobby supplies, take a moment to look at your model’s main paint scheme and plan the environment around basic color theory:
Use Complementary Colors: If your miniature features cool tones, a warm base will make it stand out instantly. For instance, if you are painting a Frost Dragon with icy-blue scales, consider placing it on a dark, rocky volcanic base or surrounded by deep red, blood-soaked snow. The intense color contrast will immediately draw the viewer’s eye up to the model.
Unify a Squad: If you are painting an entire unit or an evil cultist warband, giving them a matching, continuous theme—like sections of a ruined summoning circle spread across multiple bases—visually binds the models together as a cohesive team when placed on the table.
Incorporate High-Contrast Details: Imagine hewing glowing mystic runes onto flat rocks for a Dwarf Runelord. By using simple layering or glazing techniques, you can make those runes appear illuminated, adding a magical element to an otherwise earthy stone base.
🏆 Case Study: How a Single Storytelling Detail Changed My Zombie Dragon
Years ago, I painted a massive Zombie Dragon. I absolutely loved the concept of the model—a diabolical, undead monster. The figure featured a massive jaw with incredibly sharp, prominent teeth right at the front of the miniature.
While designing the base, I wanted to emphasize exactly how terrifying this creature would be to face on the battlefield. I wanted to add a psychological impact for anyone playing against it.
By carefully drawing a thick strand of clear hot glue from its lower jaw and tongue down to the stone base, I created a realistic, disgusting strand of drool. Once the glue was fully set, I painted the strand with a glossy, translucent technical paint designed to mimic realistic blood.
This simple detail made the dragon look as though it had just finished devouring its prey. I carried that bloody theme down onto the dragon’s claws and across the stalagmite it was mounted to.
I received more compliments on that single detail than almost any other part of the model. It succeeded because it added an experience to the miniature. Viewers weren’t just looking at a neatly painted toy; the gory detail added a clear narrative persona and immediate danger to the subject.
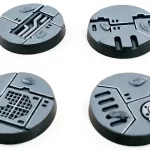
🛠️ Step-by-Step Mini-Guides for Popular Terrain Types
Achieving beautiful, texturized bases doesn’t require complex or messy steps. Here are three beginner-friendly recipes to build popular battlefield environments safely and efficiently:
1. The Arid Desert Base
The Steps: Apply a uniform layer of desert-textured hobby paste across the plastic base. While the paste is wet, press a small, jagged piece of torn cork bark into the center to simulate a sun-bleached desert rock. Once dry, wash the texture with a light brown shade and dry-brush with an off-white color. Finish by gluing a single dead, straw-colored grass tuft next to the rock.
2. The Overgrown Forest Floor
The Steps: Cover the base with an earthy, dark-brown texture paste. Once fully dry, apply a thin layer of watered-down PVA glue over select sections and sprinkle on fine green flock or static grass to simulate patchworks of moss. Add a vibrant green grass tuft and a small piece of a real dried root to act as a mossy, fallen log.
3. The Muddy Battlefield
The Steps: Apply a thick, irregular layer of dark mud texture paste, using a plastic palette knife to create realistic ruts, puddles, and uneven terrain. While wet, imbed a few plastic skeleton components (like a skull or ribcage) directly into the mud. Once completely dry, apply a high-gloss varnish strictly over the deepest mud recesses to give it a wet, swampy appearance.
🛒 Build Your Storytelling Toolkit
You don’t need a massive workshop of raw materials to start creating these settings. Modern hobby supplies like pre-mixed texture pastes, cork bark chunks, and seasonal grass tufts make the process incredibly clean, fast, and repeatable across an entire army.
Remember, miniature painting takes time, and the long hours spent blocking in your base coats and washing your model give you the perfect opportunity to brainstorm exactly how you want to present the finished piece.
Don’t treat the base as an afterthought. Look at it as your canvas to add personality, context, and striking visual contrast to your favorite models. Grab your texture paste, experiment with contrasting colors, and let your miniatures tell their own stories!