
Mythic Minis is reader-supported. When you buy through our affiliate links, we may earn a small commission—never costing you anything extra. Your support helps us keep creating helpful painting guides and hobby resources for everyone.
Introduction
The Imperial Royal Guard are some of the most iconic figures in the Star Wars galaxy—silent, imposing, and utterly loyal to Emperor Palpatine. In this painting guide, we’re building a striking red retinue to accompany Emperor Palpatine, perfect for Star Wars: Legion. To tie them into our broader theme, we’ve mounted these guards on spaceship deck plate bases, adding a crisp, industrial feel that contrasts beautifully with their vivid crimson attire. Whether you’re painting for display or tabletop play, this tutorial will help you capture their regal menace with style and cohesion.
What You’ll Need

To start painting the Imperial Royal Guards you will, of course, need the Imperial Royal Guards unit expansion kit from Atomic Mass Games.
Unfortunately, this kit was discontinued because of licensing issues or some kind of ridiculous legalese.
But! If you do still have an old kit laying around that you want to paint, I will be keeping this painting guide online.
Recommended General Painting and Hobby Supplies
[table id=2 /]
We’re looking for a fairly simple color scheme that makes the Royal Imperial Guard look great on the table but also look imposing with the rest of your army of the Galactic Empire.
We’re going to put the emphasis on those imposing red cloaks and make their weapons add to the intimidation factor with some cool metallics.
Building and Priming

Optional Build Step
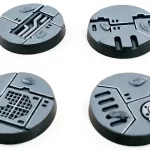
I’m going to be basing the Imperial Royal Guard on the Premium Trooper Bases shown above (primed in black), but I want to paint them separate. I’ve temporarily superglued the figures down on plain bases for ease of priming and painting. The superglued figures can be easily broken off the plain bases, with a little care, and transferred onto the Premium Trooper Bases later.
The plain bases allow easier handling when priming, and when painting because I like to use a paint handle.
Priming in Grey Seer
As shown above, I’ve primed in Grey Seer. I didn’t want to go too stark white, nor did I want to go black. Grey Seer is on the lighter side of medium and will make the red base coats very vibrant.
If you’re new to priming, check out our post How to Prime Your Miniatures for a Smooth Paint Job.
Base Coats for Imperial Royal Guard
We’re using a total of 4 base colors, Mephiston Red, Iron Hands Steel, Hashnut Copper, and Corvus Black. Check the cards below for the areas and sequence that we’re using these colors. For these steps, a small base brush (size 1-2 round) worked perfectly to keep the project neat.

Mephiston Red
You may paint the entire model Mephiston Red, but I have tried to avoid the weapons to make those base coats a little easier to cover. Make sure to get the insides and bottoms of the cloaks.

Iron Hands Steel and
Gal Vorbak
Next, paint the melee weapons Iron Hands Steel. You may need multiple thin coats for good color development and to correct any mistakes from the Mephiston Red.
Paint the clothes (pants and sleeves) of the Guards Gal Vorbak – a nice burgundy color.

Hashnut Copper and Corvus Black
There are details on the melee weapons I painted Hashnut Copper for variation.
Paint the grips of the melee weapons and the blaster Corvus Black. Also be sure to get the Guards’ eye-slits in their helmets with Corvus Black as well.
Applying Shade to the Imperial Royal Guard
Shading is a simple two-color process that can be done at the same time if you’re neat about it. We’re using Carroburg Crimson for the red parts, and we’re using Nuln Oil for the weapons. In this step, I’m using my go-to Medium Shade Brush (size 2-3 round).

Carroburg Crimson
A healthy coat of Carroburg Crimson will enhance the vibrance of the Mephiston Red and Gal Vorbak while creating shadows in the recesses, helping us to push contrast with our next steps of layering and shading.
Be careful of the shade pooling at the bottoms of the cloaks in the creases. You can wick excess paint away with a clean medium dry brush.

Nuln Oil
I put a generous coat of Nuln Oil on the weapons, including the blaster. You may have to manipulate the shade a little to get it to pool where you want it.
Layering Up Our Colors
In this step we’re going to bring the raised parts of the cloak and helm up with Evil Sunz Scarlet, and for the weapons we will revisit our base colors – Iron Hands Steel and Hashnut Copper to brighten the details.

Evil Sunz Scarlet
Paint the raised parts of the Mephiston Red with Evil Sunz Scarlet to bring up the red, vibrant color and to create contrast.
Multiple layers in the more prominent areas such as the mask, the helm, and the raised creases in the cloak will push the color up further.

Iron Hands Steel and Hashnut Copper
Paint the metallics on their respective colors where the shade hasn’t settled to get rid of coffee staining and to give the weapons depth and the illusion of light sourcing.
Highlighting to Push Detail and Contrast
Finishing the model with touches of Wild Rider Red and Iron Hands Steel to really make details pop and push further contrast. For this step, a small layer brush (size 0-1 liner) would be ideal, and a small drybrush can be used for easy details on the weapons.

Wild Rider Red Front
Using Wild Rider Red, paint the very top edges of details and creases to give a beautiful highlight to the details of these models.
Be sure to get the gloves, boots, and helm along with the cloak.

Wild Rider Red Back
Here’s a rear view capturing the very top creases on the cloak and even some light sourcing on the top of the helm.

Stormhost Silver and Sycorax Bronze
Touching the top of the melee weapons with Stormhost Silver on the metal part of the weapon, and Sycorax Bronze on the copper parts of the weapon will also add light sourcing and make the details pop.
Just a touch of Stormhost Silver, using a small drybrush, would give the feintest highlight on the weapon grip. You can do the same for the Guard with the blaster to highlight some of the weapon’s details.
Final Steps – Finishing the Royal Imperial Guard

Our final step is to disconnect the Guard from their plain bases. Very carefully pry them off with a hobby knife or clippers.
Here the Imperial Royal Guard have been permanently glued (plastic glue) to Space Ship Deck Plate bases and have taken their place as Emperor Palpatine’s retinue/
For a guide on how to paint these bases check out: How to Paint Spaceship Deck Plate Bases
Wrap Up!
That concludes my guide on how to paint Imperial Royal Guard for Star Wars Legion.
We followed a simple base-shade-layer approach to painting these miniatures, and we added a simple edge highlight at the end to brighten the color scheme a little and make the paint job pop.
We also used a pre-sculpted base, which was fun to paint, and the Imperial Royal Guard look great as a retinue for Emperor Palpatine affixed in their Death Star / Capital Ship environment.
No responses yet